- Rebuilt the front shocks
- Rebuilt the front master brake cylinder
- Rebuilt the rear brake calliper
- Fitted the battery tray mount to the frame
- Made up the top and bottom yokes
... and hopefully not long now until I get the engine back.
|
|
Cheeme |
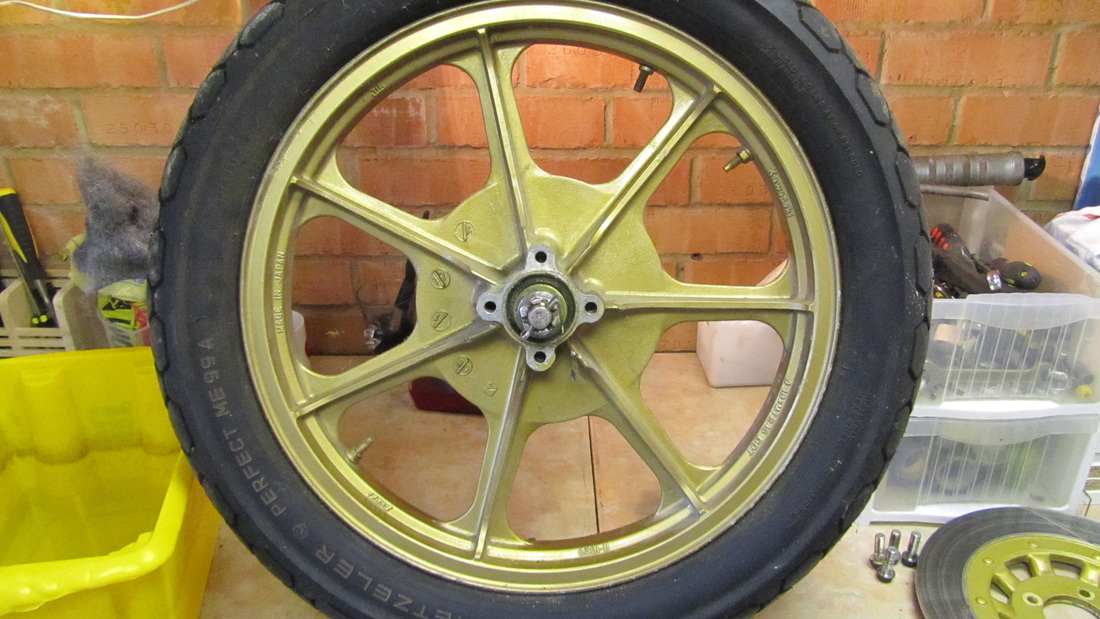
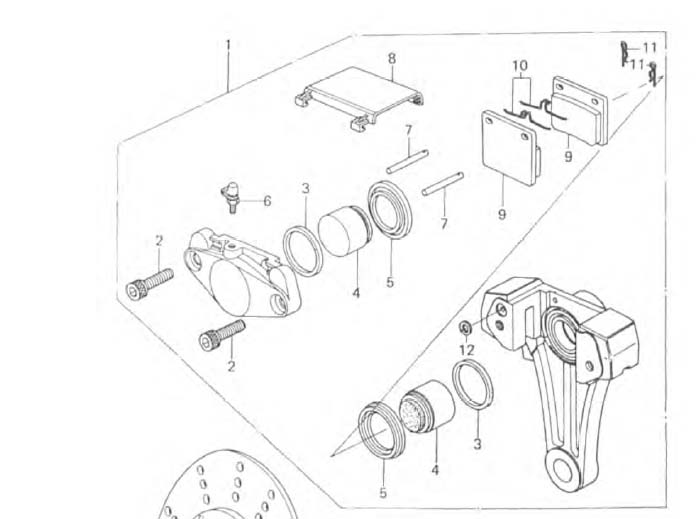
Just had a few hours on the bike yesterday as its been a busy weekend with my band CoverGirl. Having said that they were very productive ...
... and hopefully not long now until I get the engine back. Well the back end is starting to look like a motorcycle! In other news, One of the front brake callipers is rebuilt and I have finished the rebuild of the handlebar switch gear. I should get the front shock parts back from Powder Coating tomorrow and have received the replacement oil seals today so should be able to rebuild the front fo Well that proved a challenge. I took the wheels to a well known tyre garage and the winced saying that they would struggle not to damage the metal - that was last week. After speaking to Fowlers Motorcycles they instilled a little more confidence that the tyres could actually be removed with very little damage. This they did this morning...although it did take them a full hour to remove both tyres!
It was like xmas this morning unwrapping this lot. Bristol Motorcycle Powder Coating have done a great job on these parts and the frame. As usual the photo's don't do the work justice..! Having had a quote to refurb the old seat I decided to replace it with one from Japan - purchased through Z-Power. The model is of a MKII Z1000 rather than the Z1000H but that was also true for the refurbished cover so given they would both not actually be true 'H' seat's I thought it best to go for new. I'll keep hold of the old seat just in case at some point I find an 'H' cover. UPDATE: This seat does NOT fit the Z1000H with the ECU fitted. Read more and you'll see that I ended up refurbing my original seat base and foam. Initially i recovered it myself but realised it was more difficult to get a really good finish myself so decided to get it covered professionally by P&P Seats in Birmingham. It takes around 6 weeks but is worth the wait. Now this was interesting. I even went to the stage of buying a blind bearing removal tool (see previous post) which didn't really work for me...or at least didn't complete the job. I started with by heating the surrounding area with a blow lamp to expand the socket a little - that was the theory anyway. Then used the blind bearing removal tool which provided a little gap between the bearing and the inner spacer - just enough for me to get at the bearing from the other side with a long rod.Tapping away with loads of patients at the bearing released it after about 5mins. So, as I collect the last lot early next week I should be in a position to drop off the shocks and brake calliper as well as the wheels ....assuming the puller does the trick and releases the bearings. I finally released the stuck piston from the rear brake calliper. Im sure it was a culmination of efforts over the past month or so but what finally released it was a soak in WD40 overnight followed by heating with a blow lamp and then hitting it with about 250psi of air pressure through the brake line inlet. My compressor is a plain old car tyre type that is rated at 300psi although initially I couldnt seem to get past about 150psi. I established I had a few leaks by dunking the caliper in water as i pumped air into it. The seal between the two caliper parts was leaking as was the plastic adapter I was using to connect the compressor to the calliper - I didn't have too many other options for connectors short of trashing a brake line. To sort out the gap between calliper parts I smeared each with a thin layer of grease and to sort the plastic connector I found that masking tape gave me the best seal. That deserves a beer! Wheels So having decided that I will get the wheels powder coated this year rather than waiting until next winter I have set about dismantling them. Most of this has been fairly straight forward up until removing the bearings. Having researched this a bit I have now ordered a 'Blind Bearing Puller' (£30 on ebay) which should do the trick. Both bearings will need to be replaced however in both wheels as the puller grabs the inner and destroys the integrity of the bearing...more £'s to add to the accounts. Rear Brake Caliper
If you have been following my blog then you'll know that I have been struggling with this part for a while. There are two pistons, one of which is well and truly stuck firm. Last night (..with a little help from my Dad) we soaked the caliper in WD40 for a while then warmed it and then attached it to a 300PSI compressor. ok it hasnt fully released the piston BUT IT MOVED! My plan is to soak it further while i look at another way of attaching the compressor as I was loosing pressure on the plug joint. Fingers crossed I may yet be able to salvage the calliper. |
AuthorShaun Chivers. Archives
August 2016
Categories |